opencv自带RGB ↔ GRAY
Transformations within RGB space like adding/removing the alpha channel, reversing the channel order, conversion to/from 16-bit RGB color (R5:G6:B5 or R5:G5:B5), as well as conversion to/from grayscale using:
RGB[A] to Gray:Y←0.299⋅R+0.587⋅G+0.114⋅B
and
Gray to RGB[A]:R←Y,G←Y,B←Y,A←max(ChannelRange)
The conversion from a RGB image to gray is done with:
1 | 1 cvtColor(src, bwsrc, cv::COLOR_RGB2GRAY); |
Changing Color-space
There are more than 150 color-space conversion methods available in OpenCV. But we will look into only two which are most widely used ones, BGR↔ Gray and BGR ↔ HSV.
For color conversion, we use the function cv2.cvtColor(input_image, flag) where flag determines the type of conversion.
For BGR –>Gray conversion we use the flags cv2.COLOR_BGR2GRAY. Similarly for BGR –> HSV, we use the flag cv2.COLOR_BGR2HSV. To get other flags, just run following commands in your Python terminal :
1 | import cv2 |
Note
For HSV, Hue range is [0,179], Saturation range is [0,255] and Value range is [0,255]. Different softwares use different scales. So if you are comparing OpenCV values with them, you need to normalize these ranges.
ps. 此处使用的是cv2,cv不含COLOR_BGR2GRAY,但是有类似方法
Object Tracking(示例)
Now we know how to convert BGR image to HSV, we can use this to extract a colored object. In HSV, it is more easier to represent a color than RGB color-space. In our application, we will try to extract a blue colored object. So here is the method:
- Take each frame of the video
- Convert from BGR to HSV color-space
- We threshold the HSV image for a range of blue color
- Now extract the blue object alone, we can do whatever on that image we want.
Below is the code which are commented in detail :
1 | import cv2 |
Below image shows tracking of the blue object:

[转载]使用伪色彩映射的方法进行转化
转载自:
http://blog.csdn.net/yhl_leo/article/details/52163236
在实验过程中,经常见到别人实验中展现的酷炫多彩的分割图或者概率图的伪彩色图,如随意生成一张概率图:

大家都知道人眼对灰度的识别能力远差于彩色的识别能力,这灰蒙蒙的是什么鬼…
可以使用OpenCV的applyColorMap对图像进行颜色渲染,生成伪彩色图像:
C++
1 |
|
Python
1 | import cv2 |

可以看出,伪彩色图中展现的信息更多。
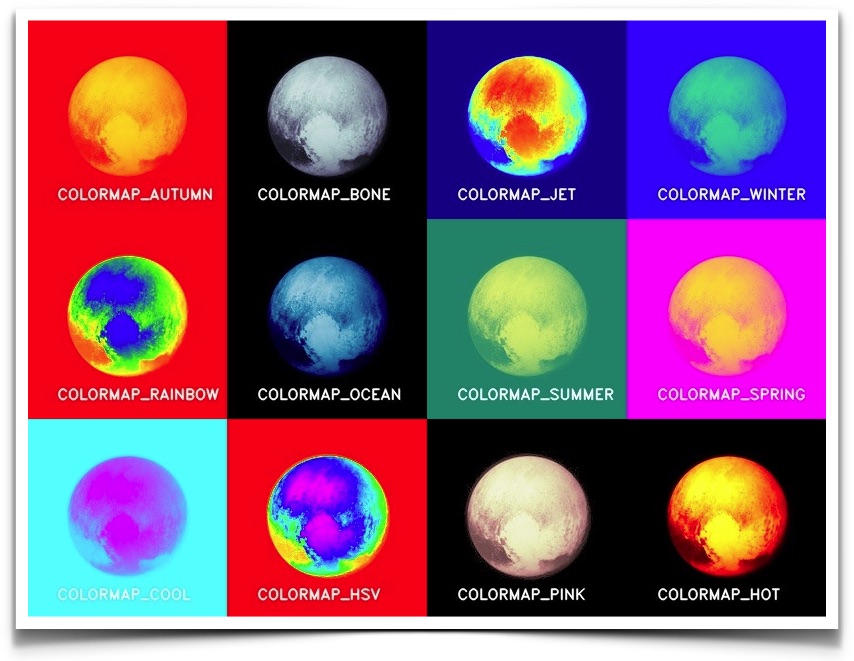
OpenCV定义了12种COLORMAP_*.可以产生这样的
| Value | Name | Scale |
|---|---|---|
| 0 | COLORMAP_AUTUMN | 
colorscale_autumn
|
| 1 | COLORMAP_BONE | 
colorscale_bone
|
| 2 | COLORMAP_JET | 
colorscale_jet
|
| 3 | COLORMAP_WINTER | 
colorscale_winter
|
| 4 | COLORMAP_RAINBOW | 
colorscale_rainbow
|
| 5 | COLORMAP_OCEAN | 
colorscale_ocean
|
| 6 | COLORMAP_SUMMER | 
colorscale_summer
|
| 7 | COLORMAP_SPRING | 
colorscale_spring
|
| 8 | COLORMAP_COOL | 
colorscale_cool
|
| 9 | COLORMAP_HSV | 
colorscale_hsv
|
| 10 | COLORMAP_PINK | 
colorscale_pink
|
| 11 | COLORMAP_HOT | 
colorscale_hot
|
此外,还可以自己定义一个颜色查询图,将灰度值0-255分别映射到对应的256种颜色上,在OpenCV中,可以创建一个256x1的彩色图,存储着预先定义的256种彩色值,通过使用LUT函数将彩色值映射到灰度图像上:
C++
1 | Mat im_color; |
Python
1 | NOTE : im_gray is 3-channel image with identical |
其中,对于多通道的输入,参数lut的通道数可以为1或者与输入图像的通道数相同。
附上一张OpenCV提供的12种样式表的示例图:
参考:
- Changing Colorspaces
- Color conversions
- OpenCV docs: applyColorMap
- OpenCV docs: LUT
- Learn OpenCV: applyColorMap for pseudocoloring in OpenCV
